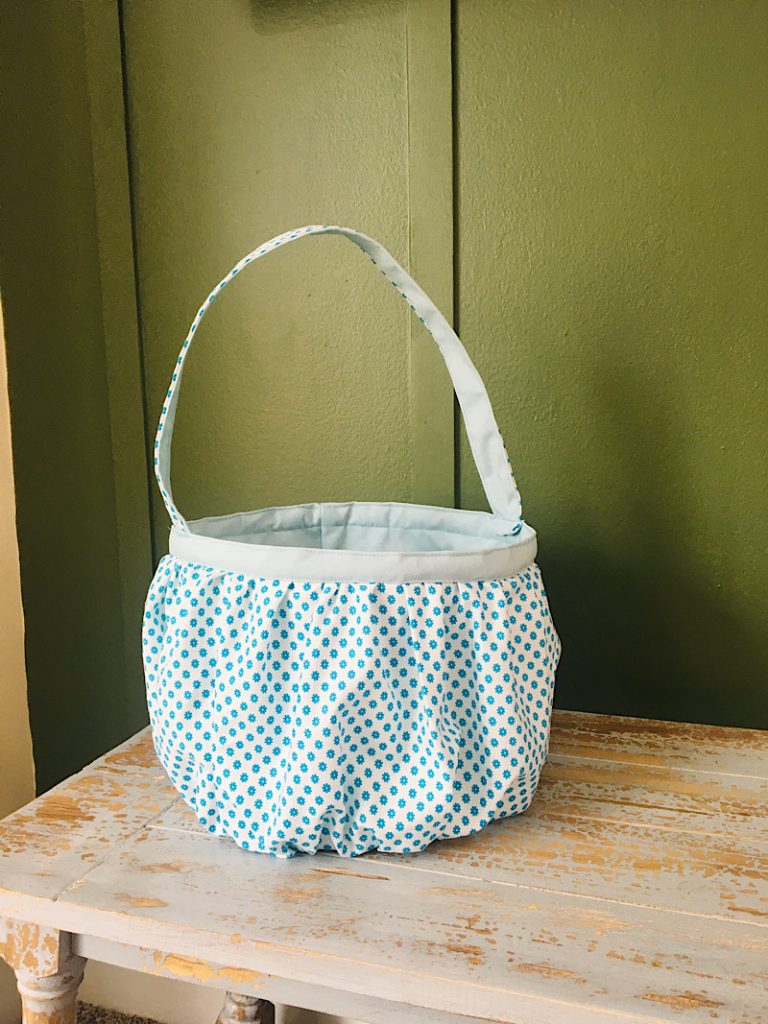
The poofy gathers on this fabric basket are playful and perfect for Easter! This easy basket can be made in any size, with or without a handle!
This sewing patten is really versatile because you can make this basket with or without a handle, which makes it great for a cubby basket or toy basket, an Easter basket or gift basket!
You can also finish the top in multiple ways, to make it your own. It’s super simple, I promise!
Check out my scrappy easter basket for another cute idea!
Supplies Needed
The fabric amounts listed are for the jumbo sized basket I made. You can make your smaller, shorter, oval shaped, whatever you want by following the same basic tutorial.
- 1 yard patterned fabric for the outside of the basket, 44+ inches wide(I used a medium-heavy weight cotton)
- 2/3 yard solid colored bottom weight fabric for the lining, 44+ inches wide (a thicker material will give your basket a more sturdy shape bit also be harder to sew)
- Two pieces of interfacing, 10″x10″, and 10″x34″. This may fit on a 1/3 yard if your interfacing is 44″ wide. (a heavier interfacing will help with the sturdiness also, but will be harder to sew. Your call! Can be fusible or sew-in.)
- A ruler or measuring tape
- Fabric marking pen, chalk, or marker
- A serger (optional)
- A heavy duty needle (I used one since my fabric was thick, you can choose what you think will work)
- Matching thread, sewing pins, scissors, etc.
How To Sew A Gathered Fabric Basket


Step 1. Make The Round Base
Cut your lining fabric into two, 10″x44″ wide strips. Then, cut 10 inches off the end of both of them, to leave you with two 10″x10″ squares, and two 10″x34″ rectangles, and a scrap piece.
First you are going to cut out two circles.
Fold one of the squares in half twice, like a napkin.
From the corner fold, measure and mark out 5 inches on both edges, and many times diagonally out from the corner. You can make these any size you want. I chose to make 10 inch squares, so i marked a 5 inch radius in this step.)

Then cut along the dots you made.

Open the fabric to reveal a nice 10 inch circle.

Use this circle to cut another one from the other 10 inch square. Then also cut a circle from the corner of the interfacing.

Make a sandwich with your two lining pieces, and the interfacing inside.

The right sides of the lining should both be facing out. Pin it together, then baste around the edges with a 1/4 inch seam allowance.

Set it aside for now.
Step 2. Make The Basket Lining
Cut your lining to be as tall as you want, and as long as the circumference of the circle plus an inch. (I used a “find the circumference of a circle” calculator for this.) For my basket, I made it 10″x32.5″.
Also cut a piece of interfacing the same dimensions.

Place the interfacing on the wrong side of the lining, and baste it or iron it on to attach.

Fold the strip in half with the right sides together, and sew down the short side with a 3/8ths seam allowance.

You now have a loop for the walls of your basket.

Step 3. Create The Gathers
The exterior fabric gathers are made by cutting a strip that it as tall as the lining, and at least twice as long.
If you are using 1 yard of the exterior fabric, you can cut 2 10″x30″ strips and sew them together to make one long strip.
If you want an even more pronounced gather, make a longer strip. It could look really cool with a very tight gather.

Fold the fabric in half lengthwise with the right sides together, and sew down the short end to make a loop.

To gather the fabric, change your stitch settings on your machine to be as long as possible. Sew a basting stitch around the entire top edge with a 1/4 inch seam allowance, do NOT backstitch at the beginning or end. Leave a couple inches of thread on the ends for a tail.

Starting on one side, pull the top thread tail to bunch up the fabric. Then gently slide those gathers down the thread and keep pulling the thread to gather it more.

Continue to gather the top edge until it is the same circumference as the lining piece. Then tie off the tails so it doesn’t ungather.
Move the gathers around the edge so they are evenly spaced all around.

Repeat these steps to gather the bottom edge of the fabric as well.

Step 4. Attach The Gathers
Turn your lining loop piece so that the right side is facing in. Make sure the gathered fabric piece is right side facing out.
Place the lining loop inside of the gathered loop, aligning the side seams. Pin them together along the top and bottom edges.

Sew the layers together, with a 3/8ths inch seam allowance. Carefully make sure not to ruin the spacing of the gathers.

Now your basket “walls” are assembled. Here is the outside and inside:


Step 5. Sew On The Bottom
Turn the basket “walls” inside out. Grab the circle bottom piece you assembled earlier, and pin it to the bottom edge of the basket “walls”, with the right sides facing.

Sew around the perimeter of the circle with a 3/8ths seam allowance. I found it was easier to have the circle part facing down on the machine, and the basket side walls facing up. That way, you can pull and adjust the sides as you go to make sure they don’t bunch up.


Trim and finish the edge of the seam with a zig zag stitch, or serge it. You could even bind over it for a very finished look.

Then turn the basket right side out and shape the bottom to see how it looks.

Step 6. Finish The Top Hem
I originally was going to add a binding to the top hem to finish it. My daughter insisted the plain gathered edge was cute enough. I finally decided to just turn it down twice and topstitch it. You can do what you like. 🙂
Fold the top edge down towards the outside of the basket, twice. Pin it in place, then sew around the bottom fold.

I also topstitched around the top fold to make it extra crisp. It was thick so I couldn’t keep my line perfectly straight. My kids won’t mind. 🙂

At this point you have a completed basket base! It is very cute! You can leave it like this if you are using it on a shelf or cubby, or you can move to step 7 to add a handle for an Easter basket.
Step 7. Add A Handle
Cut out 2 strips 3″x24″ big. (or any thickenss and length you think looks good.)
Stack them with right sides together, and sew down both long sides to make a tube. Turn the tube inside out, then topstitch down both sides to make a nice strap.

Fold the bottom edge of the strap under 1/2 an inch, and position it on the inside of your basket near the top. Pin it in place, and sew it to attach.

Repeat this for the other side.
Then you are done!

I like how it turned out, and I like the poofy shape. These would be perfect inside a cube storage type cubby for toys.


This basket could easily be made in smaller (or larger!) sizes by measuring a larger circle base to make your pattern from. This jumbo size is great for easter gifts like stuffed animals and toys.
This basket is washable too, just make sure you shape it afterwards so it keeps its cylindrical form.
My daughter said she imagined adding some ruffled lace at the top under the hem. You could also try adding a third row of gathers in the middle of the gathered fabric and sewing it to the lining in the center as well all the way around for a divided poofy look. The possibilities are endless!
here are some more photos. Let me know if you have questions!